How to use Online Designer with the FastReport Open Source library in the ASP .NET Core + React project
FastReport
Open Source is a free product and does not include online report designer.
However, you can purchase it separately and use it in conjunction with
FastReport Open Source. In this article we will look at the way to do this in a
project with a server part on ASP .Net Core MVC, and the client part on
ReactJS.


Preparation
Before you
start building an application, you need to be sure that you have Node.JS and
.Net Core SDK 2.0 or higher installed. If you use Microsoft Visual Studio 2017
for development, the SDK is already installed.
Create the application
You can
create the application with one command. Move to the folder where you want to
create a project, call the context menu using the shift button and right-click.
Next, select the command line in the menu. At the command prompt, enter the
command:
dotnet new
react –o ReactFROSDesigner.
After that,
the ReactFROSDesigner project will be created in the current folder. Open
it in Visual Studio.
Add packages
To display
the report designer, you need a WebReport object from the
FastReport.OpenSource.Web library. Open the NuGet package manager and select
the package source nuget.org. Find FastReport packages using the search and
install two of them:
·
FastReport.OpenSource;
·
FastReport.OpenSource.Web;
In order to make libraries work, you need to
add one line of code in the Startup.cs file:
public void
Configure(IApplicationBuilder app, IHostingEnvironment env)
{
…
app.UseFastReport();
…
}
Add reports to the
project
To upload a report template to an online
designer, you need to add it to the project, as well as the data source for it.
In our case, the data source is a XMD database. Create an App_Data folder and using
the mouse drag and drop a report template and a database into it.
Create a controller
In the created application there is already one
controller - SampleDataController. Add a couple of web methods to it:
using FastReport.Web;
using System.IO;
…
[HttpGet("[action]")]
public IActionResult Design()
{
WebReport WebReport = new
WebReport();
WebReport.Width = "1000";
WebReport.Height = "1000";
WebReport.Report.Load("App_Data/Master-Detail.frx"); // Load the report into the WebReport object
System.Data.DataSet dataSet = new
System.Data.DataSet(); // Create a data source
dataSet.ReadXml("App_Data/nwind.xml"); // Open the xml database
WebReport.Report.RegisterData(dataSet, "NorthWind"); // Register the data source in the report
WebReport.Mode = WebReportMode.Designer; // Set the web report object mode - designer display
WebReport.DesignerLocale = "en";
WebReport.DesignerPath = @"WebReportDesigner/index.html"; // Set the URL of the online designer
WebReport.DesignerSaveCallBack = @"api/SampleData/SaveDesignedReport"; // Set the view URL for the report save method
WebReport.Debug = true;
ViewBag.WebReport = WebReport; // Pass the report to View
return View();
}
[HttpPost("[action]")]
public IActionResult
SaveDesignedReport(string reportID, string reportUUID)
{
ViewBag.Message = String.Format("Confirmed {0} {1}", reportID, reportUUID); // Set the message for representation
Stream reportForSave = Request.Body; // Write the result of the Post request to the stream.
string pathToSave = @"App_Data/TestReport.frx"; // Get the path to save the file
using (FileStream file = new FileStream(pathToSave, FileMode.Create)) // Create a file stream
{
reportForSave.CopyTo(file); // Save query result to file
}
return View();
}
The first
Design method creates a web report object, a data source, sets the design mode
and settings for the paths to the report designer and the report saving method.
The second
method - SaveDesignedReport handles callback events of pressing the “Save”
button in the online designer. The report will be saved to the App_Data folder
on the server.
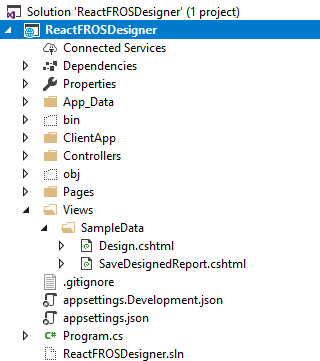
Create views
Now we need
to create views for our web methods. The idea is to use a regular ASP .Net Core
MVC application as a backend.
Add the
Views folder to the project root. Let's go back to the controller. Right-click
on the signature of the Design method and select Add view. Just click OK. In
the created view, we replace the entire code with:
@await ViewBag.WebReport.Render()
In the same
way we create a view for the SaveDesignedReport method.
For him,
the content is even simpler:
@ViewBag.Message
You should
get this hierarchy:

Client part
We proceed to the implementation of the client
side. Due to the fact that we have created a demo application, the entire
structure of the client application is ready for us. We just need to edit some files and add our component. Let's start
with it. In the project manager, find the ClientApp folder. Drill down it in a
tree. Next, open the src and components folder. Here you need to add a new
JavaScript file, let's call it Designer.js. Consider the contents of this file:
import React, { PureComponent } from 'react';
export class Designer extends PureComponent {
constructor(props) {
super(props);
this.state = { content: '', loading: true };
fetch('api/SampleData/Design', { mode: 'cors' })
.then(response => response.text())
.then(data => {
this.setState({ content: data, loading: false });
});
}
static renderContent(content) {
return (
<div dangerouslySetInnerHTML={{ __html: content }} />
)
}
render() {
let contents = this.state.loading
? <p><em>Loading...</em></p>
: Designer.renderContent(this.state.content);
return (
<div>
{contents}
</div>
);
}
}
In the class constructor, we declare states and
execute a fetch that will make a ‘get’ request to the server to get the data.
The static renderContent method receives the
request response to the server and converts it to secure html, so that React
can embed this code into the DOM.
Next, the render function displays the result
of the static renderContent method.
Now you need to embed the created component
into the existing page structure. Editing the NavMenu.js file:
export class NavMenu extends Component {
displayName = NavMenu.name
render() {
return (
<Navbar inverse fixedTop fluid collapseOnSelect>
<Navbar.Header>
<Navbar.Brand>
<Link to={'/'}>ReactFROSDesigner</Link>
</Navbar.Brand>
<Navbar.Toggle />
</Navbar.Header>
<Navbar.Collapse>
<Nav>
…
<LinkContainer to={'/designer'}>
<NavItem>
Designer
</NavItem>
</LinkContainer>
</Nav>
</Navbar.Collapse>
</Navbar>
);
}
}
And another file - App.js:
…
import { Designer } from './components/Designer';
export default class App extends Component {
displayName = App.name
render() {
return (
<Layout>
…
<Route path='/designer' component={Designer} />
…
</Layout>
);
}
}
That's all.
Now we can start our application and make sure that it works:

Go to the
Report tab and click the Save button:

As you can
see, the message ‘saved’ was displayed on the right. This means that our
SaveDesignedReport method successfully saved the report. Let's check it
in the App_Data folder:

There was added
TestReport.frx file.
Summarizing,
we can say that it is not so difficult to use an online designer in React
applications. We used
only standard solutions and no complex algorithms.


Comments
Post a Comment