How to use FastReport Open Source with Vue.Js
Presently popular SPA -
one-page applications - use different frameworks and libraries. But, if they
can work with the server part on the basis of ASP .Net Core, then you can
always use the free report generator FastReport OpenSource.
Today we will look at an
example of displaying the report FastReport.OpenSource in a one-page
application based on the popular framework Vue.js.
To create SPA application
based on the Vue.js library with the server part on ASP .Net Core MVC, you must
have:
- Node.js – software package for running JavaScript code on the server.
- Net core 2.0 sdk and higher, or Microsoft Visual Studio 2017.
Now .Net framework has no
template for a single page SPA application. Of course, we can create an ASP
.Net Core MVC application and manually add the necessary files and folders for
the Vue application. But it’s much easier to add a vue template and generate an
application from the command line.
Open the Windows command prompt. Create a folder in which you plan to
create an application and navigate to it in the console using the cd command.
Now, at the command prompt, enter the command:
dotnet new - install Microsoft.AspNetCore.SpaTemplates :: *
Next you will see a list of installed templates:

If you did
not find Vue among them, then try the installation again.
Now create
the application with the command:
dotnet new vue
-o FROSVue
You will
see the following warning:
Before
running this project on the command line, you must restore NPM packages by
running "npm install"
Well, in
the command line, go to the folder of the created application:
cd FROSVue
And we
execute the command:
npm install
After that,
the package manager will analyze the package.json file and install the
necessary packages.
Open the
created project in Visual Studio.
First of
all, install the necessary packages in the NuGet manager:

Find and install packages -
FastReport.OpenSource and FastReport.OpenSource.Web.
To use FastReport in the application, add in
one line of code in the Startup.cs file:
public void Configure(IApplicationBuilder app,
IHostingEnvironment env)
{
…
app.UseFastReport();
…
}
Due to the
fact that we used the generator of the application, we have in fact a working
application with a demo filling of the back-end and front-end.
Now, in the
wwwroot directory, create another one - App_Data. In it we will place the
report templates and data source for them:

Now let’s turn to programming. Use the existing
controller - SampleDataController.cs:
public class SampleDataController : Controller
{
private IHostingEnvironment _env;
public
SampleDataController(IHostingEnvironment env)
{
_env = env;
}
[HttpGet("[action]")]
public IActionResult DisplayReport(string name)
{
var webRoot = _env.WebRootPath;
WebReport WebReport = new WebReport();
WebReport.Width = "1000";
WebReport.Height = "1000";
WebReport.Report.Load(System.IO.Path.Combine(webRoot,
(String.Format("App_Data/{0}.frx", name)))); // Load the report into the WebReport object
//WebReport.Report.Load(System.IO.Path.Combine(webRoot,
"App_Data/Matrix.frx"));
System.Data.DataSet dataSet = new System.Data.DataSet(); // Create a data source
dataSet.ReadXml(System.IO.Path.Combine(webRoot, "App_Data/nwind.xml")); // Open the xml
database
WebReport.Report.RegisterData(dataSet, "NorthWind"); // Registering the data source in the report
ViewBag.WebReport = WebReport; // pass the report to View
return View();
}
}
Add a view
for this web method. To do this, in the Views folder, add another one -
SampleData. Now back to the controller. Right click on the signature of the
DisplayReport method, and select the AddView... item from the context menu:
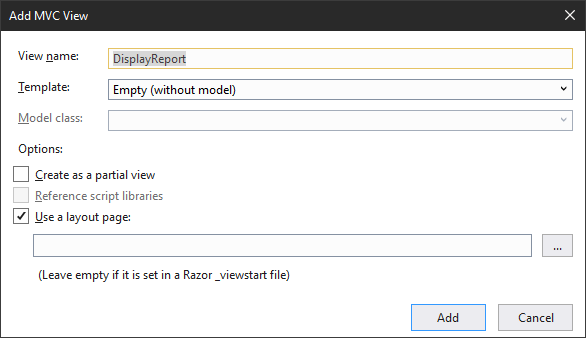
After clicking the Add button,
the view will open for editing. Full presentation code will be:
@await ViewBag.WebReport.Render()
We proceed to programming the
client part. In the Client_App folder, we also expand the Components folder.
All components are located in separate folders. In each of them there are two
files - html template and type script for processing the component logic. Let's
create our own new component - report. To do this, create a folder with the
same name, and in it generate the file report.vue.html with the following
content:
<template>
<div>
<div>
<input type="radio" :id="reportChoice1"
name="report" value="Matrix" v-on:click="SetReportName('Matrix')">
<label :for="reportChoice1">Matrix</label>
<input type="radio" :id="reportChoice2"
name="report" value="Matrix" v-on:click="SetReportName('Master-Detail')">
<label :for="reportChoice2">Master-Detail</label>
<input type="radio" :id="reportChoice2"
name="report" value="Matrix" v-on:click="SetReportName('Barcode')">
<label :for="reportChoice2">Barcode</label>
</div>
<button v-on:click="Clicked">Show Report</button>
<div v-if="show">
<iframe :id="report" height="1000" width="1000" :src="url"></iframe>
</div>
</div>
</template>
<script src="./report.ts"></script>
Here we have created three
radio buttons with which you can select a report to display. When a button is
selected, it executes a click event that calls the function from the script. We
will create it later.
Next, we create a regular
button that also has a click event handler. It calls the function that will
form a link to the method in the controller with the name of the report in the
parameter. Well, in the end, we display a frame with a report that will be
generated in the DisplayReport view. Although initially this frame is hidden,
since the show variable is false. After generating a link to the report, the
Clicked function will set the show flag to true, and the frame with the report
will be displayed.
Now create a script to work
with this template. Let's call it report.ts. This is what it represents:
import Vue from 'vue';
import { Component } from 'vue-property-decorator';
@Component
export default class ReportComponent extends Vue {
report: string = '';
url: string = '';
show: boolean = false;
Clicked() {
if (this.report != null) {
this.show = true;
this.url = "api/SampleData/DisplayReport?name=" + this.report;
}
}
SetReportName(text:string)
{
this.report = text;
}
}
This script implements the
ReportComponent component. Two functions are involved in this template. The
SetReportName function sets the name of the selected report, and Clicked forms
the method reference in the controller.
It remains only to embed our
component in the application. In the file boot.ts add the link:
const routes = [
…
{ path: '/report', component: require('./components/report/report.vue.html') }
];
And in the file navmenu.vue.html insert
another item in the list:
<ul class="nav
navbar-nav">
…
<li>
<router-link to="/report">
<span class="glyphicon
glyphicon-th-list"></span> Report
</router-link>
</li>
</ul>
That's all. Run the application:

Go to the Report tab:

Now select one of the three reports and click the Show
Report button:

And we get the selected report. As you can see, the
implementation of displaying a web report on Vue.js is very simple. You can use
FastReport.OpenSource in almost any web application with a backend on .Net
Core.


Comments
Post a Comment