How to make a report viewer on Avalonia and FastReport Open Source. Part 1
The
well-known WPF platform allows .Net developers to create their own non-standard
program interfaces by using the XAML language in form design. Many developers
have liked this, but the trouble is that WPF does not fit into the modern
concept of cross-platform. To fill this gap, there was created a UI (user interface)
framework that allows you to create applications on the .Net Framework with a
graphical interface on XAML for all popular platforms: Windows, Linux, OSX, and
in the future Android, iOS. In essence, this is a cross-platform implementation
of the WPF approach. Avalonia is evolving, new controls that are in WPF are
constantly appearing. Of course there are differences in the use of Avalonia compared
to WPF, however, they are not radical. We now turn to the topic of the article.
In this
article, we will look at the way to use the Fast Report Open Source report
generator in the Avalonia project. We will create an application - report
viewer in a format prepared to be shown. Reports in Fast Report Open Source
have two formats - frx and fpx. The first is a report template that is created
in a special designer, the second one is a report prepared for display, which
includes a template and data for its content.
Install Avalonia.
I will make
a reservation right away, we will consider programming on Avalonia in the
context of Microsoft Visual Studio. Therefore, the first question you will face
is how to install Avalonia?
There are two
ways to install this framework: via VisualStudio and from the GIT repository.
The first method is very simple. In Visual Studio, open the Tools ->
Extensions and Updates menu:
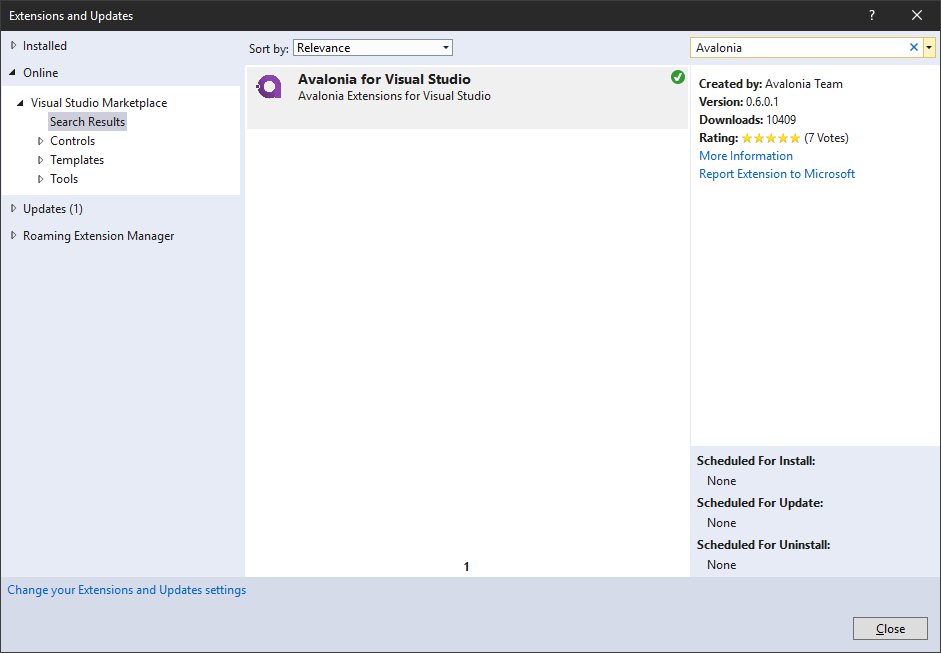
In the tree
on the left, open the Online node, and in the search bar in the right corner
enter Avalonia. And
install the extension found.
The second
method is more complicated. You clone the Avalonia repository from GitHub:
https://github.com/AvaloniaUI/Avalonia, open the Windows command line and enter
the command:
dotnet new
--install [path-to-repository]
Where
[path-to-repository] is the path to the cloned or downloaded Avalonia
repository.
How to create a project
Both ways
of installing Avalonia will lead to the same result - you will have access to
Avalonia project templates.
And here again
we have two options for creating an Avalonia application: from the studio or
from the command prompt.
The first
option looks like this:

The
second option. Create a folder. In CMD, move to this folder using the cd
command and execute one more command:
dotnet new avalonia.app -o Viewer
where
the Viewer is the name of the project.
It is clear
from the screenshot above that we have two templates available:
- Avalonia Application - a simple framework of the application with the minimum set of required files;
- Avalonia MVVM Application - an application based on the Model-View-ViewModel template with ReactiveUI.
We are
interested in a simple frame.
Once we
have created the application, you will need to restore the packages. To do
this, open the project, select the menu Tools -> NuGet Package Manager ->
Package Manager Console. In the window that appears, we enter this command:
Dotnet
restore
Avalonia
can work as .Net Framework, and with .Net Core. You can see what target
framework is currently being used and change it in the csproj project file:
<TargetFramework>netcoreapp2.1</TargetFramework>
Any
framework will be suitable for our project. So leave the default setting.
Since we
are creating the report viewer FastReport.Net, then we need to install the
FastReport.OpenSource library. Open the NuGet package manager using the context
menu on the project file. We need to install the following packages:

- Avalonia;
- Avalonia.Desktop;
- FastReport.OpenSource;
- Microsoft.NetCore.App.
Avalonia is positioned as a cross-platform
analog of WPF. But, since this is still a third-party product, visual design of
the form in Visual Studio is not supported. Therefore, we will have to add all
controls using tags in the XAML representation of the program window. If you
are well-versed in XAML and know the controls you need, then it is even faster
than dragging visual components with your mouse.
So, initially we have the document
MainWindow.xaml with the following code:
<Window xmlns="https://github.com/avaloniaui"
xmlns:x="http://schemas.microsoft.com/winfx/2006/xaml"
Title="AvaloniaFROSViewer">
Hello World!
</Window>
If you start the application now, you will only
see the text “Hello World!” To place the components in the window, we need a
Grid:
<Window xmlns="https://github.com/avaloniaui"
Title="Report Viewer" Height="900" Width="800" SizeToContent="Width" CanResize="false" >
<Grid>
…
</Grid>
</Window>
All subsequent code will be placed inside the
<Grid> tag. To manage the report we will need a number of buttons:
- Open report;
- Go to the first page;
- Go back to the page;
- Go to the next page;
- Go to the last page;
- Zoom in;
- Zoom out.
These buttons need to be grouped somehow. It is
best to make an improvised toolbar using the panel. Unfortunately, there is no
regular ToolBar control yet. So that the buttons are in the same size and
style, we place on them images corresponding to the purpose. Thus the code of
our toolbar will be as follows:
<StackPanel Orientation="Horizontal" HorizontalAlignment="left" VerticalAlignment="Top" Background="#AA000000">
<Button Name="Open" Margin="5" Background="Transparent">
<Image Source="Resources/001.ico" Width="16" Height="16"></Image>
</Button>
<Button Name="First" Click="First_Click" Margin="5" Background="Transparent">
<Image Source="Resources/frst.png"></Image>
</Button>
<Button Name="Prev" Click="Prev_Click" Margin="5" Background="Transparent">
<Image Source="Resources/prr.png"></Image>
</Button>
<Button Name="Next" Click="Next_Click" Margin="5" Background="Transparent">
<Image Source="Resources/nxt.png"></Image>
</Button>
<Button Name="Last" Click="Last_Click" Margin="5" Background="Transparent">
<Image Source="Resources/lst.png"></Image>
</Button>
<Button Name="ZoomIn" Click="Zoom_in_Click" Margin="5" Background="Transparent">
+
</Button>
<Button Name="ZoomOut" Click="Zoom_out_Click" Margin="5" Background="Transparent">
-
</Button>
</StackPanel>
Each button has a “Name” attribute. It is
necessary to access an object from a C # window script. We will look at this
later. Also note that all buttons except the first one have a Click event, in
which the name of the handler method from the script is specified. Specially
for making the example, for the first button, we will define a click event
handler in the script code.
We have 4 buttons to navigate the report, but
this is not always enough. What if the report has a half hundreds of pages, and
we need to view the 25th one? Therefore, we add a text box in which
you can enter the page number and go to it. Also, this field will always
display the current page number. Place this field between the Prev and Next buttons:
<TextBox Name="PageNumber" Height="30" Margin="5" TextWrapping="Wrap" Text="" VerticalAlignment="Top" Width="50" KeyDown="PageNumber_KeyDown"/>
For the text field, we use a keystroke event on
the keyboard.
So, we have created controls, now we will add
an Image object in which we will display the report pages in PNG format. But,
knowing that the report will be scaled, you need to provide scroll bars. It is implemented like this:
<ScrollViewer VerticalScrollBarVisibility="Visible"
HorizontalScrollBarVisibility="Visible" Margin="0,35,0,0" HorizontalContentAlignment="Left" VerticalContentAlignment="Top" RenderTransformOrigin="0.5,0.5" HorizontalAlignment="Left" Width="800">
<Image Name="img" RenderTransformOrigin="0.5,0.5" Stretch="None" />
</ScrollViewer>
The ScrollViewer control will allow us to
scroll the image if the size of the Image object goes beyond the ScrollViewer
bounds.
This concludes with the design of the window
and go to the script - MainWindow.xaml.cs.
We will need the following libraries:
using Avalonia.Controls;
using Avalonia.Markup.Xaml;
using System;
using FastReport;
using System.Collections.Generic;
using FastReport.Export.Image;
using System.IO;
using Avalonia.Input;
using Avalonia.Interactivity;
Now consider the component initialization method:
private Button OpenBtn;
private Image img;
private TextBox PageNumber;
private void
InitializeComponent()
{
AvaloniaXamlLoader.Load(this);
this.OpenBtn = this.FindControl<Button>("Open");
OpenBtn.Click += OpenFile;
this.img = this.FindControl<Image>("img");
this.PageNumber = this.FindControl<TextBox>("PageNumber");
}
To access the controls in Avalonia, you will
have to create objects of the same type in the script, then find the necessary
controls from the xaml code by name and assign them to the created objects.
After that, you can work with the properties of these objects.
Consider the Open button as an example. At the
beginning, we declare an object of type Button. When the window is initialized,
we find a Button control with the name Open and assign it to the OpenBtn object
created earlier. Here we sign the OpenFile method on the Click event of the
OpenBtn button.
Here is the OpenFile method itself:
private async void OpenFile(object sender, RoutedEventArgs e)
{
OpenFileDialog myDialog = new OpenFileDialog();
myDialog.Filters.Add(new FileDialogFilter() { Name = "Prepared export(*.FPX)", Extensions = new List<string> { "fpx" } });
myDialog.AllowMultiple = false;
var result = await myDialog.ShowAsync(this);
LoadReport(result[0]);
}
This is an asynchronous method, since the
dialog box in Avalonia is called asynchronously. Here we create a dialog box
and set the filtering of files in it by the fpx extension. Let me remind you
that this is an extension of the report files in a format prepared for the display,
that is, they contain, in addition to the template, also data to fill in the
template. Next, we prohibit multiple selection of files. As a result, the
dialog box will return to us the list of selected files with the full path.
But, since multiple choices are prohibited for us, we take only the first
element of the array of strings and pass it to the LoadReport report loading
method:
void LoadReport(string report_name)
{
Report rep = new Report();
rep.LoadPrepared(report_name);
Report =
rep;
}
First we
create the report object. Then we load into it a file with the fpx extension at
the specified path. And at the end we assign the resulting report to the Report
object. Let’s consider this Report object:
private Report report;
private FastReport.Export.Image.ImageExport ex;
public Report Report
{
get { return report; }
set
{
ex = new FastReport.Export.Image.ImageExport();
ex.HasMultipleFiles = true;
report = value;
SetContent(report);
SetImage();
}
}
First of all, we declare a report object and a
report export object in image format. Next, create a Report property with a
rather interesting set method. In it, we create an export instance. Set the
property of the multiplicity of export files (for a set of report pages).
Assign the report and call the methods SetContent () and SetImage (). The first
one prepares content, i.e. Images. The second one sets the image to the Image
object.
private void SetContent(Report report)
{
ex.ImageFormat = ImageExportFormat.Png;
ex.Resolution = 96;
ex.Export(report, Directory.GetCurrentDirectory()
+ "/test.png");
foreach (string file in ex.GeneratedFiles)
{
pages.Add(new Avalonia.Media.Imaging.Bitmap(file));
}
}
public List<Avalonia.Media.Imaging.Bitmap> pages = new List<Avalonia.Media.Imaging.Bitmap>();
In this method, we customize the image format
in the export and its resolution and export it to the test.png file. But since
we have allowed a plurality of files for export, all subsequent files will have
an additional index in order: test.2.png, test.3.png, etc. Next, in the loop,
we iterate through all the created files and add them to the list of Bitmap
objects. Thus, we will have a list of report pages and easily select the
desired page by the ordinal index in the list.
public void SetImage()
{
img.Source = pages[0];
}
This method
simply sets the Source property for the Image object. For now, let's set for it
the first image from the list of pages.
This
concludes the first part of the article. In the second part, we will continue
to create a report viewer based on AvaloniaUI and FastReport.OpenSource.
How to make a report viewer on Avalonia and FastReport Open Source. Part 2


Comments
Post a Comment